Effortless Elegance: Your Complete Guide to Aluminium Venetian Blinds Fitting Instructions
Dreaming of sleek, modern window coverings that offer both privacy and precise light control? You’ve chosen wisely with aluminium Venetian blinds! Their clean lines and durable design make them a popular choice for any home or office. While the idea of fitting new blinds might seem daunting, it’s a surprisingly straightforward DIY project that can save you money and give you immense satisfaction.
Don’t fret! This comprehensive guide will walk you through every step of installing your aluminium Venetian blinds, ensuring a perfect, professional-looking finish. We’ll cover everything from preparation to the final touches, including essential tips and common pitfalls to avoid.
Why DIY Your Blind Installation?
- Cost Savings: Skip professional installation fees.
- Instant Gratification: Get your new blinds up and enjoying them sooner.
- Empowerment: Learn a new skill and gain confidence in your home improvement abilities.
- Custom Fit: Ensure your blinds are installed exactly how you want them.
Before You Begin: Preparation is Key!
A little preparation goes a long way in making your Venetian blind installation smooth and stress-free.
1. Gather Your Tools:
Having everything at hand will prevent frustrating interruptions. You’ll typically need:
- Your new aluminium Venetian blinds (check all components are present)
- Tape Measure: For accurate measurements.
- Pencil: For marking positions.
- Spirit Level: Crucial for straight, even installation.
- Power Drill: With appropriate drill bits for your wall or window frame material (wood, plaster, masonry).
- Screwdriver: Manual or power, matching your screws.
- Wall Plugs/Rawlplugs: If drilling into masonry or plasterboard.
- Safety Glasses: Always protect your eyes when drilling.
- Step Ladder (if necessary): For high windows.
- Vacuum Cleaner: For quick clean-up of dust.
2. Safety First!
- Wear safety glasses when drilling.
- Be aware of electrical wires or pipes behind your drilling surface. If unsure, use a stud finder or consult a professional.
- Ensure your ladder is stable.
3. Unpack and Inspect:
Carefully unpack your blinds. Check all components against the manufacturer’s packing list. Ensure there are no damaged parts. Familiarize yourself with the headrail, brackets, valance (if included), and child safety devices.
4. Understand Your Mount Type: Inside or Outside?
This is perhaps the most crucial decision and impacts where you’ll fix your brackets.
-
Inside Mount (Recess Fit):
- The blinds fit inside the window recess.
- Provides a clean, integrated look.
- Brackets will be fixed to the top or sides of the inside of your window frame/recess.
- Ensure your recess is deep enough to accommodate the full depth of the headrail and slats when fully raised.
-
Outside Mount (Face Fix):
- The blinds fit outside the window recess, covering the entire window opening and often extending beyond it.
- Can make windows appear larger and helps block more light.
- Brackets will be fixed to the wall or architrave above the window.
- Consider how far you want the blinds to extend past the window frame on each side.
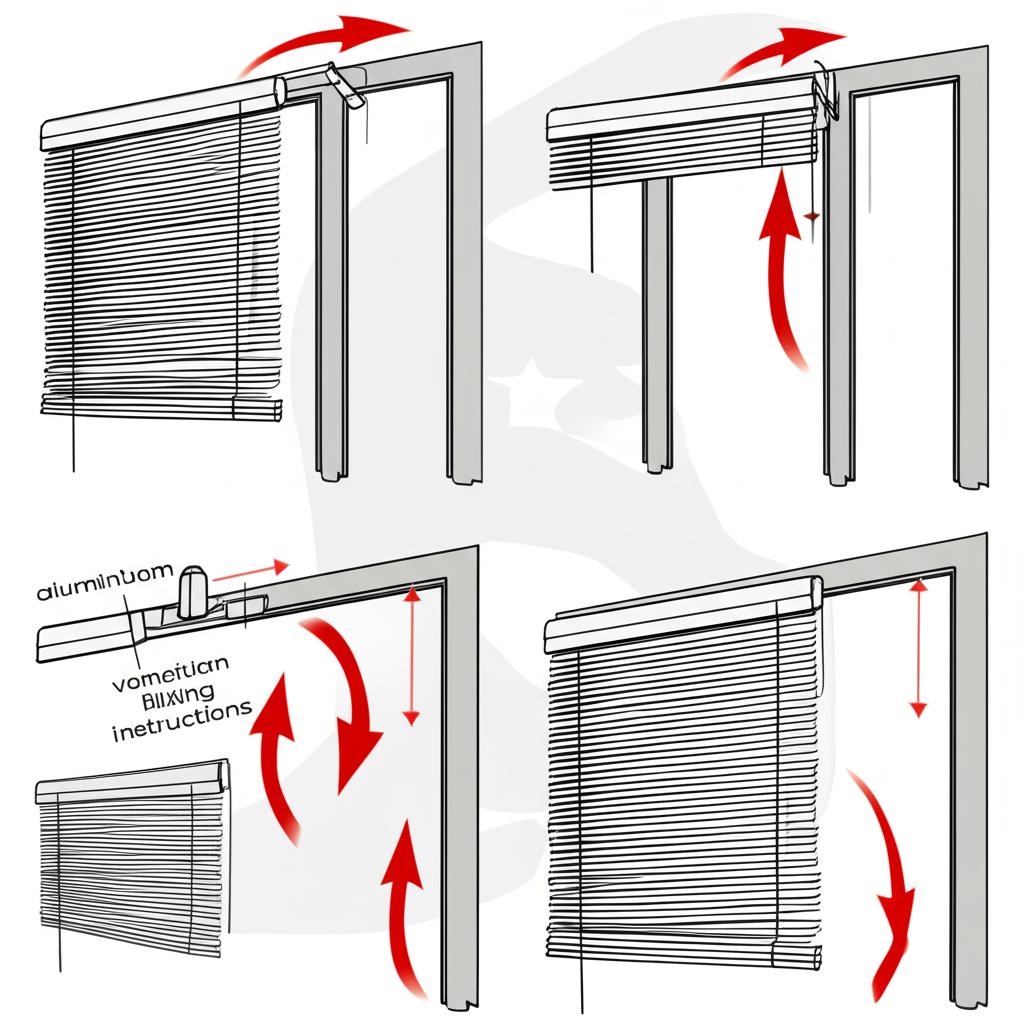
Step-by-Step Aluminium Venetian Blinds Fitting Instructions
Follow these steps carefully for a smooth installation. Remember to always refer to your specific manufacturer’s instructions as there can be slight variations.
Step 1: Mark Bracket Positions
This is where precision pays off!
-
For Inside Mount:
- Hold the headrail of your blind up inside the recess to determine the best position for your brackets. They usually go about 5-10cm in from each end of the headrail.
- Use your spirit level to ensure your marks are perfectly straight and level. Mark the screw holes for the brackets on the top or side of the recess.
- Ensure the brackets won’t interfere with the blind’s operation or any handles.
-
For Outside Mount:
- Hold the headrail against the wall above your window. Decide how high you want it (usually a few inches above the window frame) and how wide you want it to extend past the frame on each side.
- Again, use your spirit level to mark the screw holes for your brackets, ensuring they are level with each other and typically 5-10cm from each end of where the headrail will sit.
- Make sure your marked positions will allow the blind to fully clear the window when raised.
Step 2: Drill Pilot Holes
Now it’s time to make some holes!
- Choose the correct drill bit size for your screws and wall plugs (if using). It should be slightly smaller than the diameter of the screw.
- Drill carefully and straight into your marked positions. If drilling into masonry, use a hammer drill function. If into plasterboard, you might need specialist plasterboard fixings.
- Drill to the appropriate depth for your screws and wall plugs.
Step 3: Secure the Brackets
With the pilot holes drilled, it’s time to fix the brackets.
- If using wall plugs, gently tap them into the pilot holes until flush with the surface.
- Position your first bracket over the pilot holes and secure it with screws.
- Repeat for the second bracket, ensuring it is still perfectly level with the first.
- If your blinds are very wide, your kit might include a third central bracket for extra support. If so, mark, drill, and secure it in the middle, ensuring it’s in line with the other two.
- Do not over-tighten the screws, especially when drilling into wood or plastic, as this can strip the hole or crack the material. Just tighten until snug and secure.
Step 4: Attach the Headrail
This is the moment your blinds start to take shape!
- Most aluminium Venetian blinds use a simple clip-in or push-in bracket system.
- Carefully lift the headrail of the blind and align it with the brackets.
- Gently push or clip the headrail into the brackets until you hear a click or feel it securely slot into place. Some brackets have small levers or clips you need to close to secure the headrail.
- Give the headrail a gentle tug to ensure it’s firmly secured.
Step 5: Install the Valance (If Applicable)
Many Venetian blinds come with a decorative valance (sometimes called a fascia or pelmet) that clips onto the front of the headrail to conceal the working mechanisms.
- If your blind has a valance, it usually has small clips that attach to the top or front of the headrail.
- Carefully align the clips on the valance with the corresponding slots or points on the headrail.
- Gently push or click the valance into place. It should fit snugly.
Step 6: Attach Child Safety Devices
This step is absolutely critical for homes with children or pets. Ignoring this step can lead to serious hazards.
- Your Venetian blinds will come with child safety devices, typically a cord cleat (for wrapping cords) and/or a cord tensioner (to keep pull cords taut against the wall).
- Locate the appropriate position on the wall where the device will be easily accessible but out of reach of small children. For cord cleats, this is usually at a height of 1.5 meters from the floor. For tensioners, it should be where the cord can be kept taut.
- Mark the screw holes, drill pilot holes, and securely fix the device to the wall.
- Always use the child safety device by wrapping excess cords around the cleat or ensuring the tensioner keeps the cord taut. This prevents dangerous loops.
Step 7: Test and Adjust
Almost there!
- Operate the blind fully. Pull the cords to raise and lower the slats. Use the tilt wand or cords to open and close the slats.
- Check for smooth operation. Do the slats tilt evenly? Does the blind raise and lower without snagging?
- If anything feels off, double-check the headrail is fully seated in the brackets.
Common Mistakes to Avoid
- Incorrect Measuring: The biggest culprit for ill-fitting blinds. Measure at least three times (top, middle, bottom for width, and left, middle, right for height) and use the smallest measurement for inside mounts, or add extra for outside mounts.
- Skipping Pilot Holes: Especially when drilling into hard materials, skipping pilot holes can crack your wall/frame or snap screws.
- Not Using a Spirit Level: Leads to wonky, unprofessional-looking blinds. Always use a spirit level!
- Over-Tightening Screws: Can strip the screw heads, damage the wall, or crack the window frame.
- Ignoring Child Safety Devices: Never skip this step! It’s a non-negotiable safety measure.
- Rushing the Job: Take your time. Precision now saves headaches later.
Top Tips for a Perfect Finish
- Read the Manufacturer’s Instructions: While this guide is comprehensive, your specific blind model might have unique features or slightly different fitting methods. Always consult the instructions provided with your blinds.
- Clean as You Go: Drilling creates dust. A quick vacuum after drilling each set of holes keeps your workspace tidy.
- Consider Your Wall Material: Different wall materials (plasterboard, brick, wood, UPVC) require different drill bits and fixings. Use the correct ones for a secure fit.
- Get a Second Pair of Hands: For wider or heavier blinds, having someone to help hold the headrail during marking and installation can make the process much easier and safer.
- Don’t Force It: If something isn’t fitting, re-evaluate. Forcing components can cause damage.
Frequently Asked Questions (FAQs)
Q: Can I install these blinds on UPVC window frames?
A: Yes, you can. You’ll need to use specialist self-tapping screws designed for UPVC. Drill very carefully with a drill bit specifically for UPVC, and do not over-tighten. Be aware of the window’s warranty implications before drilling into the frame.
Q: My walls are plasterboard. What fixings should I use?
A: Standard screws may pull out of plasterboard. You’ll need specialist plasterboard fixings like ‘fischer plugs’, ‘toggle bolts’, or ‘self-drilling plasterboard anchors’ for a secure installation.
Q: How far apart should the brackets be?
A: Generally, place brackets about 5-10cm (2-4 inches) from each end of the headrail. For wider blinds, a central bracket may be necessary for support. Always check your manufacturer’s specific recommendations.
Q: What is the valance for?
A: The valance (or pelmet/fascia) is a decorative strip that clips to the front of the headrail. Its purpose is to conceal the operational mechanisms (headrail, cords, ladders) for a cleaner, more aesthetically pleasing look.
Enjoy Your New Blinds!
Congratulations! You’ve successfully installed your aluminium Venetian blinds. Step back and admire your handiwork. You’ve not only enhanced your home’s aesthetics but also gained a valuable new skill. Enjoy the perfect blend of privacy, light control, and modern style your new blinds bring!
FAQ
Q. What tools will I need to install my aluminium Venetian blinds?
A. You will typically need a pencil for marking, a tape measure, a drill with appropriate drill bits (for pilot holes), a screwdriver (manual or powered), and a spirit level to ensure a straight installation. Safety glasses are also recommended for protection.
Q. Where should I position the mounting brackets for the best support?
A. For inside mounts, position the brackets at least 2 inches from each end of the headrail, ensuring they do not obstruct the internal mechanisms. For outside mounts, place them evenly spaced beyond the window frame, typically 2-3 inches wider than the window opening, ensuring the headrail is fully supported. Always use a spirit level to ensure the brackets are perfectly level with each other.
Q. How do I attach the mounting brackets to the wall or window frame?
A. Mark the precise positions for your bracket screws using a pencil and a spirit level. For timber frames or window sills, drill small pilot holes before screwing the brackets directly into place. For drywall or plaster, use appropriate wall anchors or plugs before securing the brackets. Ensure they are firmly attached and capable of supporting the blind’s weight.
Q. How do I install the headrail into the pre-mounted brackets?
A. With the brackets securely installed, position the headrail so that its front lip hooks onto the front edge of the bracket. Then, push the back of the headrail upwards until it clicks securely into the bracket’s locking mechanism. Some brackets may have a hinged clip or lever that needs to be closed and snapped into place to lock the headrail.
Q. What are hold-down brackets and how do I install them?
A. Hold-down brackets are small, L-shaped brackets installed at the bottom of the window frame or wall, designed to secure the bottom rail of the blind. This prevents the blind from swinging freely, which is useful for doors or in high-traffic areas. To install, fully lower the blind, mark the screw holes through the bottom rail’s end caps, and then screw the hold-down brackets into place.
Q. How do I attach the tilt wand and control cords after the blind is installed?
A. The tilt wand typically has a small hook or clip at its top. Simply attach this hook to the eyelet or ring provided on the blind’s tilt mechanism, usually located on the left or right side of the headrail. The lift cords may already be threaded through the cord condenser; if not, ensure they pass through it correctly and the tassel is securely attached to the end of the cords.
Q. What should I do if my aluminium Venetian blind doesn’t hang level after installation?
A. First, double-check that your mounting brackets are perfectly level. If they are, a slight unevenness might be due to minor tension differences in the lift cords. To adjust, you may need to access the cord locks within the headrail and slightly release or tighten the cord for the higher side until the bottom rail is even. If the issue is significant, re-checking and re-leveling the bracket installation is recommended.